Our Classic Christmas Decorations

Thanks to At Home Stores for sponsoring this post.

I love decorating for the holidays. From putting up our Christmas tree with all of it’s special ornaments to hanging our personalized stockings above the fireplace, it’s one of my favorite things to do. I love it so much in fact, that I’ve been known to decorate on November 1st sometimes! (I can hear all of you “not before Thanksgiving” folks gasp at that statement! lol)

This year I headed to my local At Home store to buy some new decorations to brighten up my home and front porch. At Home Stores have thousands of holiday items, available at everyday low prices. I really loved the variety of decorations and how they were organized by holiday themes. There is something for everyone, from the beach lover looking for “Sea & Greetings” decor to trendy pink and rose gold decorations.

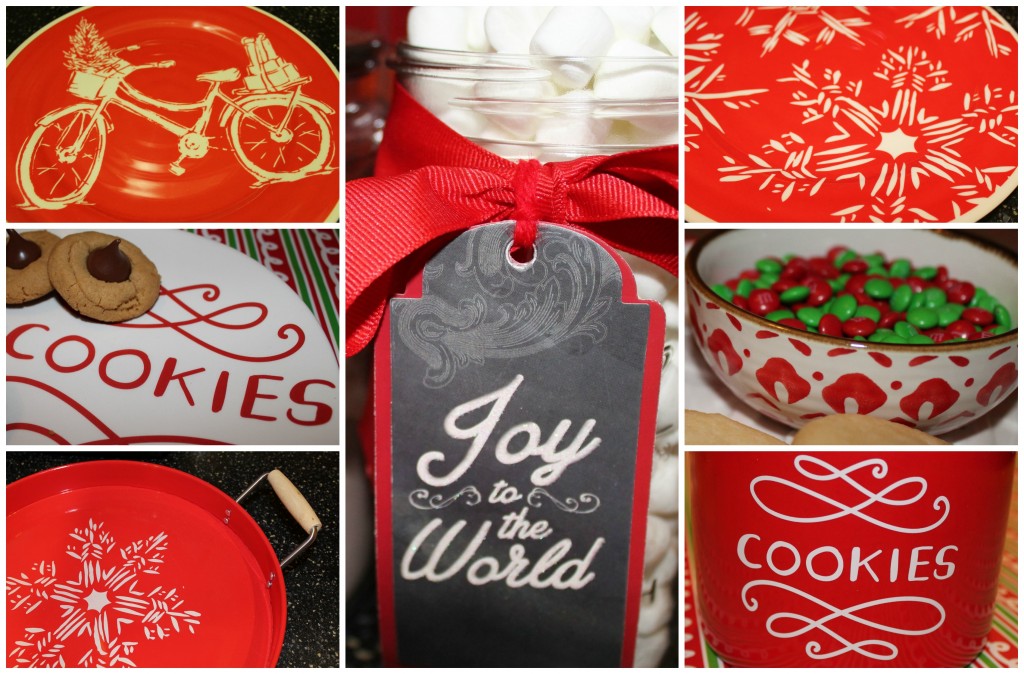
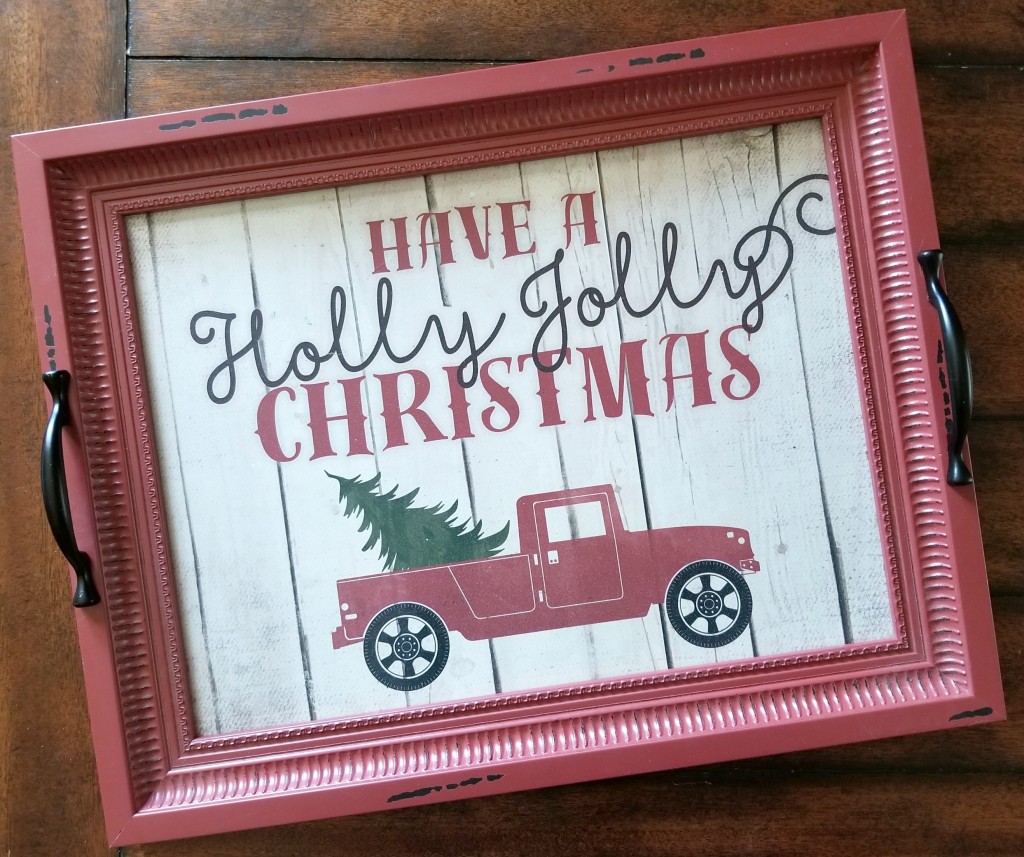
Personally, when it comes to holiday decorations, I tend to stick to the traditional reds and greens. Over the past couple of years I’d fallen in love with the decor that had an old red pickup truck carrying a Christmas tree and I was pleasantly surprised to find some items to start my classic Christmas collection with (like this beautiful tray pictured above). I also picked up a number of items to add some Christmas to every room- from the kitchen to the living room to the bathroom.

The main space I was hoping to decorate though was my outdoor space. Last year you wouldn’t have known how much I love Christmas just by looking at the outside of our home. We had just wrapped some lights around the columns by our entrance and added a wreath to the front door. This year I wanted a more festive look but still wanted it to be easy.

In just twenty minutes our front porch went from “blah” to festive all thanks to the amazing finds from At Home Stores. We added two strands of berry and pinecone lighted garland, a welcome sign, a festive wreath and a bright red door mat.

Our decorated front porch puts a smile on my face every time I come home now. Do you have a space you’d like to makeover? Check out At Home Stores for finds to give any room or outdoor area a personal touch!

DIY Football Rag Wreath

I love football season. Whether I’m sitting on the sidelines at my son’s game, cheering on my favorite teams as I watch them on tv or simply have a game on in the background while I work, there is something about football that makes me happy and brings back good memories. In August I get my football decorations out and they stay out until Thanksgiving. Last year I made a rag wreath and I realized that I never featured it here on the blog so I wanted to share it. I made a wreath like this with crepe paper around the holidays back in grade school (1991!) and my mom had kept it for years. Though the crepe paper was a cheap option at the time, it didn’t keep that well, so I figured that fabric was the better choice for this. This wreath can be made using your team colors or embellished with your child’s name and uniform number if you want to make it even fancier but I kept it simple with what I consider “football colors” -brown (the ball) and green (the grass)- along with a white and gold colored fabric to lighten it up, wooden football decorations and a football themed ribbon to hang it.

The wreath is simple to make. You’ll need about six yards of fabric in the colors of your choice, a wire wreath base, a football or team themed ribbon and some football shaped wooden pieces. You can find all of these items at your local craft store.

Cut the fabric into strips that are approximately six inches long and an inch or two wide. Then tie it on to the wire with a knot in the middle of the ribbon.

Continue tying the fabric pieces on the wire, alternating colors.

Once you’ve fully covered one wire you can go around two or three of the others until the wreath looks full.

The next step is to add any embellishments and add a ribbon at the top so you can hang the wreath.

Want more football party ideas? Check out some of my most popular football posts below!

Football Party with Baked Potato Bar

“Concession Stand” Themed Football Party

Easy ways to update your bathroom for football season parties

Backyard Updates To Brighten Summer Days

Thanks to Kmart for sponsoring this post!

The boy’s baseball season is over which means our family is spending a lot more time relaxing at home instead of sitting at the baseball field. I love spending time in the backyard but our space was less than ideal for family time so we stocked up on goodies at Kmart to make it a place we want to spend all of our lazy afternoons. From a new patio table to a hammock to bright floral tableware, our space looks totally transformed and we spent all day Saturday just enjoying it.

Even better? The Summer Blowout is going on right now in stores and online with 10-40% off in all departments (excluding grocery), with some items up to 50% off! All your favorites, including apparel, footwear, electronics, home decor and toys are on sale to make your summer – and your backyard- ridiculously awesome.

The first thing I wanted to get was a new patio table because our old one had a broken top from an umbrella that had gotten loose a few weeks ago. I knew I wanted a table that seated 4-6 and wasn’t tempered glass so I did some searching and found this tile top table. It is perfect! It looks classy and is very spacious which is great for entertaining.

To brighten up the brown table I went with floral tableware in cheerful colors. This is probably the first time I have a complete set of tableware since having kids! (Any other parents have a cabinet full of mismatched pieces due to plates and bowls getting broken by little hands that were not yet ready for big boy plates?)

I also got floral placemats and serving trays in a matching design which added even more color to the table.

One other thing I had been wanting to get was an indoor/outdoor serving cart. I found this affordable one and it folds up so it’s perfect for our small space. I chose to get the serving cart in brown but it comes in a number of colors like red, teal and green to match any decor. I hung little solar powered lanterns on it so it will light up at night time for the evenings we will spend on our patio.

Having a serving cart is helpful when you are entertaining because it gives guests more room at the table. (It’s also a great place to keep dessert away from little ones that want to taste test the icing :) lol)

Kmart has aisles full of outdoor decor so even if you can’t update your whole patio, you can still get a few pieces to brighten up your space. I found some beautiful ceramic lanterns, outdoor pillows (like this butterfly one below), colorful door mats and so much more.

I really love all of the updates that we made to our patio. My favorite addition to our backyard though? A hammock! This hammock is perfect for taking an afternoon nap, reading a book or relaxing as you watch your kids play. Best of all it folds upright for easy storage during the winter!

Speaking of kids playing… I used this party tub to store water balloons for my kids water balloon fight but it will also be great for holding drinks at summer parties!

Do you need to spruce up your outdoor living space or want to stock up on a few more essentials before the end of the season? Hurry to Kmart for great deals during their Summer Blowout, now through July 30th!

Is It Time For New Kitchen Appliances?

The reviewer has been compensated in the form of a Best Buy Gift Card and/or received the product/service at a reduced price or for free.

Unless you live in a brand new house, I’m guessing you have a list of things you want to fix or update. Our home was built in the 80s and, though some updates have been done since then, I have a long list of things I’d love to do. The first, and easiest, updates would be to get new appliances. My dishwasher is the original model that was put in the home when it was built in 1988 and leaves a bit of “melted plastic” smell each time if runs. My stove also needs to be replaced since every recipe takes at least three to four times longer to cook than it should. And though my fridge is from the 90’s and works, I long for a shiny stainless steel one. See why I think it’s time for updated appliances?

A month or so ago we were perusing the appliance section at Best Buy and I was giddy seeing the new appliances with all their bells and whistles. If you are looking for new appliances you’ll want to head to Best Buy soon because you’ll be able to save some money during their Appliances Remodeling Sales Event! Best Buy makes it easy for you to stretch your dollars by offering the best deals during the season on LG appliances. You can save up to 30% off major appliance top deals (minimum savings is 5%) through April 12th. Plus, get a free $100 gift card when you buy 2 Major Appliances totaling $1500 or more. (Get the details here.) LG is also offering extra savings! Receive up to $400 back from LG via mail on select Kitchen Packages through 5/3/17. (Get the details here.)

If you are looking for a new refrigerator, this LG – InstaView™ Door-in-Door® fridge is a great choice. The LG Black Stainless Steel Series elevates your kitchen with a satin-smooth, warm and sophisticated finish. You’ll save money and energy with this ENERGY STAR® qualified LG refrigerator that exceeds energy standards.

This large capacity (24 cu ft) fridge lets you store more which is perfect for families. It’s French doors feature InstaView™ Door-in-Door®  glass panels that allow you to see inside the easy access door without letting the cold air out. Simply knock twice on the glass to illuminate the contents within.

Need a new range like I do? This sleek, black stainless steel Self-Cleaning Slide-In Electric Convection Range from LG is really nice! It features ProBake Technology for fast cook times and flavorful results. The self-cleaning feature is one I love because it keeps the inside of the LG electric range looking great without having to spend time scrubbing it. The bottom drawer stores cookie sheets, cooling racks, and more, opening up extra space in your cabinets to store all your other kitchen essentials.

What appliance are you hoping to replace soon? Do you need a new stove like I do or maybe you want one of the fancy new refrigerators?

DIY Decorative Jewelry Tray

This shop has been compensated by Collective Bias, Inc. and its advertiser. All opinions are mine alone. #StreakFreeShine #CollectiveBias

Spring is one of the most beautiful seasons. From budding flowers to pretty lace dresses to sparkling pastel colored jewels, beauty is all around us. As the weather starts to warm up and the sun starts shining a bit more, I love being able to admire the new growth of flowers and watch the birds sitting outside my window.

That very first sunny spring day though, when I open up my curtains, I am reminded of the one chore that gets a little neglected during the colder months- cleaning my windows. It’s amazing how dirty they get over the few months we are stuck inside while the sky is gray and the trees are barren. I grab my Windex® Original Glass Cleaner from under my kitchen sink and, as soon as I spray it on my windows, I start to see the dirt fading away. A couple swipes of a paper towel later and my windows are shiny clean and I can see the beautiful spring day through them.

I also like to bring the beauty of spring indoors and I do that by decorating my home with seasonal decor and fresh flowers. To bring a touch of spring into my bedroom I made a decorative jewelry tray to hold some of my favorite pieces. It was easy to make and doesn’t require a lot of materials so I wanted to share the tutorial so you could make your own.

Materials needed:

  • Round tray
  • Glass or mirror a little smaller than your tray
  • Glue or adhesive
  • Beaded necklaces made for craft projects

 Directions:

Put glue/adhesive in the middle of the tray, spreading it out the width of your mirror.

Place the glass or mirror piece in the middle of the tray and gently press it down to adhere it to the tray.

To see how long your string of beads will need to be you can put it along the bottom edge of your tray. You’ll want it long enough to go all around the bottom of your tray but not overlap. I had to tie two beaded necklaces together and then take some beads off the one end because, as you can see in the picture, it was too long.

Use your adhesive/glue to glue your beads onto the tray along the inner bottom edge of the tray. If you still have space between your beads and your mirror/glass, you can glue on a second string of beads.

This tray will get a lot of fingerprint smudges on it but it’s easy to clean with Windex® Original Glass Cleaner.

Windex® Original Glass Cleaner is my favorite product to use on glass because I know that it will always leave my glass surfaces with a streak-free shine. Thanks to its formulation with Ammonia-D®, it starts working on fingerprints, dirt, and other messes even before you wipe. Whether you need to clean the smudges on your bathroom mirror, your windows, or the glass of your jewelry tray, you can trust America’s #1 glass cleaner to get the job done!

I found Windex® Original Glass Cleaner and Windex® Vinegar Multi-Surface Cleaner in the cleaning aisle of my local Food4Less store.

Now you can see the beauty of spring outside (thanks to your clean windows) and inside, sitting on your jewelry tray.

What is your favorite thing about the spring season? Get more spring cleaning ideas here.

How To Get Your Bathroom Ready For Holiday Guests

This shop has been compensated by Collective Bias, Inc. and its advertiser. All opinions are mine alone. #GetUnderTheRim #CollectiveBias 

The holidays are coming and, for many, that means entertaining friends and family. We started a new tradition last year of having family over on Christmas Eve so, being the Type A person that I am, I’ve already started planning for it. I generally have always decorated my home for Christmas before the holiday chaos begins anyways, but I’ve also started planning the menu we will have and deep cleaning our home. I also like to get ready for any overnight guests I may have, like my younger siblings who need a place to stay when they come to town.

One room on the list to tackle is the guest bathroom. Since we live in a small home, we only have two bathrooms and our “guest” bathroom is also the bathroom that everyone in our home uses. Living with three males I’m sure you can imagine the mess I have to deal with in there. Generally Sinisa cleans the bathroom but when we are going to have guests over I like to clean it so I know everything is completely clean.

When getting the bathroom ready for guests I have a three step process. The first thing I have to do is clear the clutter. Even though the bathroom has plenty of storage, there always seem to be things left on the counter that don’t belong there.

Once the bathroom is picked up it’s time for some deep cleaning. I take down the shower curtain and put that, along with the bath rugs, in the washer. I then clean the sink and counter and shine the faucet. I scrub the tub, wipe down the walls and mirror and then move on to my least favorite part of cleaning the bathroom- the toilet.

After I clean the outside of the toilet I have to tackle the inside of it. Thankfully I’ve discovered the perfect tool for the job. The new Scotch-Brite® Disposable Toilet Scrubber is uniquely designed to reach messes under the rim that competing products miss. It also has a built-in bleach alternative cleaner with pumice that scrubs away rust & hard water stains. When I’m done cleaning the toilet I simply press the button on the handle to dispose of the scrubber and then set the handle into the holder until the next time I need it.

Once my toilet bowl is sparkly clean, I sweep and mop the floor, take out the trash, wipe down the trash can, hang the shower curtain up, put the rugs back on the floor, fill the soap dispenser and stock the toilet paper. I also make sure I have clean towels ready for our guests.

It’s then time for the fun part- decorating! Our guest bathroom has red walls so the room is already festive to begin with. I chose to add some cream, green and gold accents to the room.

I wanted to do something special for overnight guests and set out some toiletries for them in case they’d forgotten anything they needed. I had a glass hurricane to use for this project but you can use a large jar or any glass canister you have. The only other thing you’ll need to make the container is letter stickers. I used some gold ones since they would coordinate with my holiday decor but also look nice in the bathroom throughout the year.

I used the letter stickers to spell out “be our guest” on the glass. (To make sure the letters were being put on the glass in a straight line, I used a piece of paper edge to make myself a line to follow.) I then filled the glass hurricane with travel sized toiletries I had collected while traveling including shampoo, conditioner, lotion and soap. I travel often so I have tons of hotel toiletries but you could also buy travel sized toiletries at Target to fill your container.

Speaking of Target, that’s where I bought the Scotch-Brite Disposable Toilet Scrubber and Scotch-Brite® Disposable Toilet Scrubber Refills (along with a number of holiday decorations and some cute holiday pjs!). I found them in the cleaning aisle with the toilet brushes, in between the trash cans and the sponges. Right now there are some great deals on these products at Target. Look for a “Try Me Now!” Instant Redeemable Coupon on each product to save $2. There is also a Cartwheel offer to save 15% off these new products (11/6-11/12).

Now I’m ready for the holidays and for my guests! Want to see how other bloggers are getting ready for the holidays? Check out their posts here. How do you prepare your home for holiday visitors?

How We Fill Our Home With Travel Memories

Do you love to travel? So do I! Traveling is one of my favorite things to do- whether I’m exploring a new place or visiting somewhere I’ve been a dozen times. I thought it would be fun to share about ways our family remembers our special vacations by filling our home with travel memories.

The first way is pretty obvious and that is with photos of our travels. I have four square collage frames and a half dozen smaller frames I use to display our photos. I set the picture frames on a cube shelf unit and hang the collage frames on the wall above it. Seeing my family’s smiles and photos of where we have journeyed to makes me extremely happy.

Another way I fill our home with travel memories is with three collections I have. I hang Starbucks “You Are Here” mugs above my coffee cart from places that have mugs for their state (This is a plee to Starbucks- please make a mug for every state! I seek out my Iced Caramel Machiatto wherever I am and am bummed when I go to states that don’t have mugs made for them. #FirstWorldProblems). A second item I collect on my travels is fun magnets to stick on our mini-fridge. I often find these at tourist stores or gas stations. A year or so ago I also started collecting Christmas ornaments for our tree at the holidays.

I also try to bring something home from every place I go- whether it’s my airplane ticket, sand from the beach, or a napkin from the resort’s restaurant. My memory is horrible since having kids but I have found that physical things jog my memory so it’s nice to have them. I plan to make a travel scrapbook in the near future.

The other thing I recently started with my boys is a map of their travels. I bought a cork board map and little push pins and every time we return from a family trip they add a pin to their map. Right now it’s looking a little empty on the West Coast but I hope a trip to California sometime in the next couple years will give them their first pin there :)

How do you remember your travels and fill your home with travel memories? I’d love for you to leave a comment below and let me know.


Three Dream Places We’d Consider Moving To

This is a sponsored post but all thoughts are my own.

I was recently asked where I’d move if given the chance. Sinisa and I talk about this sometimes and, while we agree that we want to stay in the Chicago area for now, we do have a few places we’d consider moving if we ever had enough of the Chicago winters.

My top pick would be California, specifically the San Francisco Bay area. I’ve always loved California, from the beautiful weather most of the year to the gorgeous views that can be seen on a drive down the coast. I used to live in Redondo Beach which is close to Los Angeles. I lived there when I was in Kindergarten and 1st grade and we lived blocks from the ocean. My biggest memories of my time there are playing with snails and the school I went to. When I was in Junior High my mom lived in San Ramon which is near San Francisco and I’d go visit her. I liked visiting San Francisco but enjoyed spending time in the suburbs just as much. The only thing keeping me from moving to California is the high cost of living, especially in the Bay area.

Sinisa’s top pick of places to live would be Zagreb, Croatia where he grew up. Unlike California, Croatia is very affordable. I’m not sure how the job situation is but since I can work online from anywhere that wouldn’t be that big of an issue for us. Sinisa fondly tells me about the beautiful beaches and being able to live near the water and live off food that we catch from the sea. Croatia is a modern country with lots of old world charm and the area where he used to live is safe which is important for any family. We’d also choose Croatia for the culture and it would be great to immerse ourselves in it so the boys and I would be forced to learn the language which I know is really important to Sinisa.

Another place on Sinisa’s list of where he’d like to live is Sydney, Australia. There is a large Croatian community there so we’d look at house and land packages in Sydney to be close to those who also spoke Croatian like Sinisa does. He says it’s always Summer there which is a huge plus for us since we love the warmer months here. It would be a dream to have great weather year round. Being surrounded by water is also something so living on an island would be perfect. It would be a great adventure to discover all of Australia together as a family!

Where would you move if you could live anywhere?


How To Make Bathroom Recycling Easy

Many families recycle bottles, cans and paper products in the kitchen but it’s harder to do throughout the rest of the house. One place we use a lot of plastic bottles is in the bathroom and they tend to end up in the trashcan along with other things that can be reused, like toilet paper rolls. Turns out we aren’t alone. A 2016 consumer survey on in-home recycling habits, conducted in partnership with Johnson & Johnson Consumer Inc., shows that one-third of regular recyclers admit that it never even occurred to them to recycle in the bathroom and only one in five recyclers have a recycling bin in their bathroom.

I wanted to make bathroom recycling much easier for our family so I decorated a small trash can for the boy’s bathroom that we could put all the empty bottles and other items in until we needed them for other things around the house. I explained to my boys the importance of recycling and shared with them what types of things we could recycle in the bathroom which is everything from shampoo and mouthwash bottles to soap and bandage boxes.

To make the recycling can I used a 3 gallon garbage can and attached stickers that said “recycle”. (Note: I suggest putting a layer of mod-podge over the stickers to handle the moisture.) You could also have the kids write and color on the can. I was going to do this but the boys bathroom is also the bathroom that guests use so I decided against it because I wanted the recycling bin to blend in with the bathroom decor.

***

***

***

Not sure how to reuse empty toiletry bottles? Here are some of my favorite ways:

  • Create ISpy bottles for kids- fill the bottle with rice and small items and secure the lid with strong tape
  • Storage for small craft items like sequins and pom poms
  • Bath tub or water table dumping containers
  • Storage for tiny toys like Shopkins
  • Split large paint jugs into smaller empty toiletry bottles for easy access and use

For extra fun, when a bottle is close to being empty I add some washable kid’s paint in it and I mix it up. Then I let the kids paint a clear art mat in the bathtub. It’s easy to clean up because it’s mixed with the soap and it’s already in the tub so the mess is contained.

If the bin gets too full we can always recycle the items in it but our family tends to reuse things as many times as possible. I think it’s the preschool teacher in me that wants to find new ways to use everything before I get rid of it (see my recent post on 100 kids crafts that reuse household materials for proof).

Want to learn more about recycling personal care products used in your bathroom? Check out the Johnson & Johnson Consumer Inc. Care To Recycle® website. Care To Recycle®, a program of Johnson & Johnson Consumer Inc., provides creative new ways for parents to reimagine their recycling habits beyond the kitchen and into the bathroom, while engaging their children. The Care To Recycle® program aims to raise awareness of the importance of recycling personal care products in the bathroom, including preventing valuable materials from entering landfills unnecessarily. Together, we can help create a healthy planet for our kids today, and for future generations.

What ideas do you have for recycling products in the bathroom?

I was selected for this opportunity as a member of Clever Girls and the content and opinions expressed here are all my own.

Overhead Garage Storage Giveaway For Chicago Area {$329 Value!}

Disclosure: This is a sponsored post.

Do you have an insane amount of holiday decor in your garage? Or maybe you have shelves full of camping gear? If your garage is anything like mine, you have way too much you are trying to store alongside all the kid’s bikes and you can’t even fit both cars inside your garage.

I am so excited to be working on the #MoreSpaceInNoTime campaign and hosting one of six amazing giveaways around the country. If you live in Chicago I’m giving you a chance to win a 4′ x 8′ overhead storage unit valued at $329! This professionally installed product takes less than an hour to install and provides 96 cubic feet of storage. This storage unit is an efficient way to restore your garage space – and perhaps your sanity!

To learn more about the storage units please visit Doors by Russ, the Chicago authorized dealer, here.

**GIVEAWAY FOR CHICAGO AREA ONLY**

For a chance to win a storage unit of your own….

Leave a comment below telling me what storage issue this will solve for you!

Earn an extra entry for sharing this giveaway on social media using the hashtag #MoreSpaceInNoTime

Giveaway ends July 20, 2015 at 11:59pm CST.

WINNER MUST LIVE IN THE CHICAGO AREA.


Easy Pantry Organization

I was so excited to move into a home with an actual pantry. In our old home we only had a cabinet and it was so hard to find anything in it because of it’s size and location in our laundry room. Our new pantry is just a closet but it has space galore compared to what we used to have. It’s a nice size but I also discovered that it quickly became a mess. With wire shelving everything would tip over and it was hard to keep track of what food items were in there and what we were running low on since new groceries were just piled wherever there was space on the shelves. It was driving me crazy.

After checking out beautifully organized pantries on Pinterest, I headed to the store in search of wicker baskets. I quickly decided that I needed to find a new solution once I looked at the prices of the baskets I was hoping to buy. All the baskets I found were around $10 and, because I wanted to purchase a number of them, that just wasn’t in my budget.

I decided to try my local dollar store and discovered they had a variety of bins and baskets that would work and each was only $1 so, even if I bought 30 of them, I would still be organizing my pantry for cheap. I was going to get a couple different colors but in the end decided to stick with one solid color.

Before I went to the store I had looked in my pantry to group items in like categories. Some broader categories, like snacks, ended up being split up into more than one bin. I then counted to see how many bins I would need. I added a few extra for things I might not have thought about. For my extra shelf space, I made a note about what I wanted to store there and kept in mind what storage I might need for that.

Here is how I organized my pantry:

The top shelf is most of my holiday partyware (plates, napkins, cups, tablecloths, etc) and special serving dishes that I don’t have in my photo prop cabinet. I have bins for the following: Christmas, Thanksgiving/Fall, Halloween, 4th of July, Easter/Spring, Valentine’s Day, and Birthdays.

The second shelf is mostly for large pots that don’t fit in my cabinets and some of my small appliances. One corner is for paper products and disposable items like straws, plastic silverware and extra ziploc bags.

The top food shelf is mostly for baking supplies. I have mixes for cakes, cookies and muffins here along with frosting and other ingredients needed to make my favorite treats. We keep drink mixes, tea bags and single serve hot cocoa packets on this shelf as well.

The middle shelf holds mostly canned goods like fruits, vegetables and soups. I also have all of my pasta, noodles, and boxed meals on this shelf. I have one bin for extra condiments so if we ever run out I have spare ones in my pantry.

The bottom shelf is for the snacks. This is where I keep the cookies, chips, crackers, pretzels and things like that. I debated putting all of this on the lower shelf since I didn’t want the kids sneaking into it but I like that the kids can help make their lunches or pick out their own item during snack time. (I also have one basket in the fridge that is for their snacks so stay tuned for my fridge organization post coming soon!)

I chose to label my bins with cardstock shapes. I wrote what was in each bin with a sharpie and then stuck each one on with a glue dot. You can label them however you’d like to by using stickers, labels, or laminated paper. I hope to make some stick on labels for mine in the near future.

That’s pretty much it. Hope you all enjoyed my pantry organization post and got some ideas to organize your own food storage area. Leave a comment below if you have any questions or want to leave a link to your organized pantry. I love getting a peak into other people’s homes :)


My Festive Kitchen {Target Gift Card Giveaway}

Target is my favorite store so I’m excited to be working with them on this sponsored holiday post and giveaway.

I can never seem to get out of Target without a cart full of goodies, so when I saw the holiday kitchen and entertaining aisles I knew I was in trouble. This is our first Christmas in our new home so it was the perfect time to add some seasonal items to our kitchen. Everything was so adorable and many of the things would be perfect for making my home festive while entertaining family and friends this month.

One thing my family likes to do is get together to decorate cookies. We bake sugar cookies and then let the kids decorate them however they’d like to with frosting, candies and sprinkles. Normally the toppings are in plain bowls but I love these Threshold stoneware bowls. Though they are red and white I can use them year round since they aren’t too Christmasy.

We also like to make peanut butter kiss cookies. The kids unwrap the hershey kisses for me. It’s their favorite job because they get to sneak a few candies while mommy isn’t looking. Target has lots of cookie plates. I picked up a couple along with a cookie jar since we always have dozens of Christmas cookies during the holidays.

Another thing I made for holiday guests this year is a mini hot cocoa bar. I put hot cocoa mix in a big glass jar, marshmallows in a mason jar, and then set mugs out. I used a large gift tag and red ribbon to add a little holiday cheer to the setup.

I love how much more festive my kitchen looks now! I think it is so welcoming and I can’t wait for family to come on Christmas day to celebrate with presents, cookies and mugs of hot cocoa!

How can Target help you celebrate the holidays? Tell me what you pick up from my favorite store to make your Christmas, Chanukah or New Years celebrations brighter for a chance to win a gift card!

One reader who comments with their answer below will win a $75 Target gift card. You can earn an extra entry for sharing this post on social media (just leave a second comment with the link).

This giveaway ends December 31, 2014 at 11:59pm CST. Must be a US resident and 21 or older to win.

Babies “R” Us Happy Places Design Events {Nationwide}

When I found out the gender of my first child I did two things: buy a bunch of blue baby clothes and start planning the nursery. To help with the fun, but often overwhelming, task of designing the nursery, Babies“R”Us is launching a nationwide campaign to help expectant parents and I’m happy to be partnering with them to promote it in this sponsored post.

This Sunday, June 29th, from 12-1pm, Babies“R”Us stores nationwide will host an in-store event, where parents can meet with local designers about how to create a happy place for their baby or toddler, browse 6 room vignettes specially designed by a Disney Baby Designer, peruse a palette of paint colors provided by Home Depot, and review a printed look book of select “dream rooms” to help foster inspiration and design ideas. Plus, attendees will enjoy giveaways and prizes throughout the event. You can learn more, here.

If you are on Twitter, make sure to join the #BRUHappyPlaces Twitter party this Wednesday!

On Wednesday, June 25 at 9pm EST, we will be hosting a @Babiesrus Twitter Party and would love for you (and your readers) to participate! Babies“R”Us will be leading the chat, sharing helpful tips and tricks regarding nursery and toddler room design. To join the conversation, use #BRUHappyPlaces.


How To Make Perfect Sugar Cookies

With baking season in full-swing I wanted to share these 9 tips from Country Woman magazine to help you make the perfect sugar cookie. I’ll be baking with the boys tomorrow so these tips came just in time!

1.    Don’t Be Too Touchy: Use a light touch when handling the dough. Over-handling will result in tough cookies.

2.    Stay Cool: Refrigerate the dough before rolling for easier handling.

3.    Avoid Sticky Situations: Prevent sticking by lightly dusting with flour both the rolling pin and work surface. Be careful—working     too much extra flour into the dough will make the cookies tough.

4.    Start Small: Roll out a portion of the dough at a time; keep remaining dough in the fridge so it stays easy to work with.

5.    Create An Even Playing Field: Roll from the center to the edge, keeping a uniform thickness. Check thickness with a ruler. Uneven dough means cookies will bake unevenly, and thinner cookies may burn before thicker ones are done.

6.    Get a Clean Cut: Dip your cutter in flour or use nonstick cooking spray to keep dough from sticking to the cookie cutter.

7.    Take Out the Tools: Keep cutouts intact before and after baking by transferring them to and from the baking sheet with a large    metal spatula or pancake turner that supports the entire cutout.

8.    Keep it Simple: Limit designs and colors when decorating. Too many colors and shapes can be overwhelming.

9.    Leave Them Out to Dry: Let decorated cookies dry overnight before packaging them for gift giving or freezing.

Sleepy’s: Making Mattress Shopping Easier {Giveaway}

(Disclosure: I received a gift card and products but all thoughts are my own.)

Mattress shopping is definitely not on my list of favorite things to do. Normally, people go into stores and “try out” mattresses to see if they like the firmness of them. That, along with the price, are typically key factors in deciding which mattress to buy. Sleepy’s offers a completely different experience that makes it just a little more enjoyable and easier.

Sleepy’s offers a free comfort analysis to all their customers to help them determine which mattress will offer them the optimal support and comfort they need. When choosing a mattress at Sleepy’s they focus on which mattress allows for proper spinal alignment. They also offer suggestions for pillows as well.

I thought the poster was interesting to look at, especially the bottom half about choosing the right pillow. Up until recently I had always used thick pillows and woken up feeling like I didn’t get that great of a night’s sleep. Just a couple weeks ago I started using a thinner Soiree Latex pillow that Sleepy’s had sent me and I wake up feeling a lot more rested without any body aches and pains. It’s a great feeling!

Shopping at Sleepy’s was a nice experience. They separate the store into four different areas based on mattress type: pillow top, plush, firm and specialty. Once you choose which firmness is your favorite you head to that quarter of the store. With all the mattresses in the stores it can be overwhelming but being able to cut 3/4 of the store samples out of the decision making process really makes finding the perfect bed much easier.

Sleepy’s also has pillows, mattress covers and a number of accessories as well. I loved the pillows on display in the picture above. They have side vents but are also specially made for the type of sleeper people are.

To celebrate the new Sleepy’s location in Chicago I’m excited to share this great Sleepy’s giveaway. The “grand prize” winner will receive a gift card in their prize package which can only be used at Chicago stores. You can still win if you don’t live in Chicago but you just wouldn’t be able to use the gift card.

GIVEAWAY

Grand Prize Winner: 1 Sleepy’s $100 Gift Card (only redeemable in Chicago area Sleepy’s stores), 2 Soiree Latex Pillow, 2 Cooling Pillow Pad, and 1 Sleepy’s Neck Pillow

Second Place Winner: 2 Soiree Latex Pillow, 2 Cooling Pillow Pad and 1 Sleepy’s Neck Pillow

HOW TO ENTER

{Do any or all of the following, leave a separate comment for each you do}

1) Tell me what item you would buy at Sleepy’s

2) Follow Sleepys on Twitter

3) Follow me on Twitter

4) Comment on another one of my blog posts

5) Share this giveaway on a social media network

Giveaway ends November 24, 2013 at 11:59pm CST. Must be 18 or older and a US citizen to enter.

Adding A Little Autumn To My Home

(Disclosure: I received compensation and products to help me write this post but all thoughts are my own.)

I rarely decorate for Fall. It’s not because I don’t want to, but because it’s a crazy time of year and after I get out of my beginning-of-school fog it’s already part of the way into the season and I feel like decorating is pointless at that point. This year though, Glade invited me to add a little Autumn to my home so with their help I added a few accents that really give my home a seasonal feeling.

I found a little “Happy Harvest” sign that is perfect because it will take me past Halloween and into Thanksgiving season. I bought a box of mini pumpkins and pinecones to decorate a table and then can re-use them for the boys Fall sensory table. I also bought a tray with leaves along the edge of it but haven’t yet figured out how I’m going to incorporate that in the room.

The other brown decoration on the table in both pictures is an air freshener. Doesn’t look like it though does it? It’s the newly designed Glade® Sense & Spray® Automatic Freshener that I wrote about a few weeks ago. I love it and it is meshing well with my seasonal decor.

This week I have the Cashmere Woods scent in it and it’s my favorite scent I have tried so far. I like that the air freshener is on a timer and when it senses movement it automatically freshens our room every 20 minutes. It’s nice to be cuddling on the couch with my family and have the room smell so wonderful all the time.

I’ve realized that it doesn’t cost much to add a few seasonal pieces to my home but it really makes a difference in how welcoming our home is. How do you decorate for Fall in your home? Do you have any tips to share on how you change your decor without spending a ton of money? I’d love to hear them!

Creating A Home Office With ClosetMaid & Staples {Giveaway}

(Disclosure: I received products from Staples but all thoughts are my own.)

Working at home is a dream come true for me but it does not come without challenges. I often find myself working into the wee hours of the night because it’s hard to stop working when you are at the office 24/7. While trying to find balance I think it’s also important to have a dedicated space to work so that’s why I’m really excited to be partnering with Staples to offer one work-at-home parent the chance to win part of this amazing set along with a Staples gift card!

While I’m blessed to have a loft in my small home that is dedicated as an office space that doesn’t mean you have to have a room that’s simply dedicated to working. Be creative with the space you have. You can always create a mini-office nook in a closet or corner of a room. The ClosetMaid® Shelftrack Elite Home Office Kit sold at Staples is perfect for those who have limited space! Check out the image below for three different ideas.

This line is made up of seven different products and whether you use all of them or an assortment of them, ShelfTrack Elite creates a perfect home office (or study area). The pieces are made of chocolate laminate finish with Satin Nickel hardware. The set includes the following:

  • A Home Office Kit – with desk and 4 shelves
  • A 3-Drawer Mobile File Cabinet
  • A Bookshelf Kit – including 3 shelves
  • Fabric trays (in brown and light brown)
  • Fabric bins (in brown and light brown)

GIVEAWAY:

One winner would receive a Bookshelf Kit along and a $50 Staples Gift Card

HOW TO ENTER:

{Do any or all of the following, leave a separate comment for each you do}

1) Tell me why you want to win

2) Share this giveaway on a social network

3) Comment on another one of my posts

4) Follow ClosetMaid on Twitter

5) Follow Staples on Twitter

6) Follow me on Twitter

Giveaway ends November 8, 2013 at 11:59pm Central time. Must be a US resident, age 18 or over to win.

(Disclosure: As stated above I received the ClosetMaid® Shelftrack Elite Home Office Kit line.)


Keep Your Home Smelling Fresh With Glade® {Giveaway}

With a child still in pullups it’s hard to keep my house smelling as fresh as I’d like it to. I often rely on air fresheners to keep the air smelling nice. I received a newly designed Glade® Sense & Spray® Automatic Freshener to try in my home and after a few days of using it I know that this is one product that is going on my must-have list.

I love that Glade’s new modern styles fit in with my home decor. With a 360 degree sensor they are perfect for every room in my home. The scent canister is hidden inside so nobody would guess it was an air freshener.

For those who like to explore different scents there are many to try with this new air freshener. I have Clean Linen in mine which smells like freshly washed laundry. Lavender & Vanilla, Pure Vanilla Joy, and Hawaiian Breeze sound delightful as well.

GIVEAWAY:

One reader will win a new Glade® Sense & Spray® Automatic Freshener and refill

HOW TO ENTER:

{Do any or all of the following, leave a separate comment for each you do}

1) Tell me which scent you’d try first

2) Share this giveaway on a social network

3) Follow @Glade on Twitter

4) Follow @aliciamarie112 on Twitter

Giveaway ends October 27, 2013 at 11:59pm Central time. Must be a US resident, 18 or older to enter.

(Disclosure: I received a free sample but thoughts are my own.)

#CookWithKohls Sweepstakes

I partnered with Kohl’s a lot this past Summer and Fall to show you some hot fashions but this month I’m working with them to help share the word about their new #CookWithKohls Sweepstakes. Check out the Food Network page on Kohls.com for loads of inspiration, recipes and pics.

I went shopping yesterday in the kitchen department at Kohl’s and was surprised by how much they offered. I had bought small appliances at Kohl’s before but hadn’t ventured into the department that much. Check out what I bought:

I got mini pie pans to make individual apple pies with all of the apples I have leftover from apple picking. I got collapsible measuring cups because we needed them. I love that they collapse to save room since we don’t have much cabinet space. I also got a dutch oven because I’ve never had one and I’ve always wanted one :)

Want to win the #CookWithKohls Sweepstakes so you can get some Food Network items of your own? To enter, log onto Twitter or Instagram and show/tell us what you’re baking for a chance to win a $500 Kohl’s Gift Card. One grand prize winner will even win a $5,000 Kohl’s Gift Card! Follow @Kohls and include the hashtag #CookWithKohls. Rules: http://oak.ctx.ly/r/bhwo

Here was my entry into the Sweepstakes:

See how easy that is? It took me less than a minute to enter to win a gift card! Good luck!

(Disclosure: I received a gift card from Kohl’s to go shopping but all thoughts are my own.)

“The Dump” Luxury Discount Home Furnishing Store Opening In Chicago Area {Giveaway}

The Dump, America’s fastest-growing furniture outlet which features famous name furniture at dramatic discounts, is coming to the Chicago area! It will officially open its new location in Lombard on August 30th. 

The Dump, which is located at S. Highland Ave and Butterfield Road, in the former Great Indoors space, will be open Friday, Saturday and Sunday every week. Totaling a massive 134,000 square feet, The Dump is the largest high-end furniture outlet in the Chicago marketplace. 

“The secret of our success is based on our unique retail business model, which is focused on delivering the best savings for our customers,” E.J. Strelitz continued.  “For example, at The Dump, we are only open Friday, Saturday and Sunday, which allows us to keep the cost of doing business down as well as refresh and replenish the entire inventory before the weekend rush. This demonstrates our intuitive understanding of our customer, who prefers to buy furnishings with other family members or friends, making the weekend an ideal time to shop.  Plus, shoppers can expect to find something new every weekend at The Dump, which attracts a high level of increased traffic among our loyal customer base.”

 “At The Dump, we have always been completely transparent with our buying model,” says Randi Strelitz, Executive Vice President, Haynes Furniture/TheDump.  “Our customers know we don’t pay full price, which means they don’t pay full price.  We accomplish this by purchasing overstocks, one-of-a-kinds, factory sell-outs, showroom models, and design prototypes – all brand-new, top-quality merchandise at highly discounted prices.  This creates the ultimate shopping experience for our customers every weekend of the year.”

“The Lombard store will feature the latest furnishings at 30 to 80 percent discounted prices for all areas of your home, including modern living and dining room furniture, chic rugs, and much more,” added Randi Strelitz.

GIVEAWAY:

One reader will win a $134 gift card to The Dump

HOW TO ENTER:

{Do any or all of the following, leave a separate comment for each you do}

1) Leave a comment telling me what piece of furniture you’d like to get for your home

2) Follow The Dump on Twitter

3) Follow me on Twitter

4) Share this giveaway on a social network

5) Leave a comment on another blog post

Giveaway ends August 30, 2013 at 11:59pm Central time. Must be 18 or older and a US resident to win.

(Disclosure: I was not compensated for posting this. I was invited to the Chicago grand opening and can’t attend but I wanted to post because I thought you all would enjoy this.)

How To Create A Functional Sports Nook In Your Home {Giveaway}

For over a year I have been trying to develop a system for organizing all of our sports gear and clothing. I created a space near our front door since our home is small and that’s what worked best for us. I had been using some hooks, a laundry basket, and a tin basket to keep everything organized but it just wasn’t working. When I was contacted to review a Rawlings Flexible Sports Organizer I thought it would be a great help for storing some of the smaller items that always found their way throughout my downstairs.

I have been using the Rawlings organizer for a few weeks now and it has really helped keep everything in one spot. With sports 5-6 days a week this Fall I wanted to share how we are staying organized and what works best for us.

What’s hanging: I love the over the door hooks. I found this one at either Walmart or Target. I hang the baseball bag up top. The Rawlings organizer is made to be hung on the wall but since i don’t have much wall space I have it hanging off the hooks on our coat closet. I love how sturdy this organizer is and how many pockets and spaces to put everything it has. We keep our balls, sports socks, extra bats, shin guards, water bottles, and extra cleats (for out of season sports) in it. On the wall I have a coat hook where we hang up the sports jackets and, in winter, the kid’s winter coats.

What’s on the table: I use an old side table to hold a variety of other items. The white basket has all of the sports clothing in it. We used to have all of their clothes in their bedroom closet upstairs but it was just a pain to find everything we needed mixed in with all of their other shirts and pants. No more wondering where the uniform shirt is or missing soccer socks. Everything is washed and put into this one small basket so when we are getting ready to run out the door I have quick access to what I need. In the tin container next to it I have cleats. I keep the soccer bag here, too.

Do you have all of your sports gear organized or can it be found around your house and garage? If you want to create a sports nook of your own you are in luck because I am giving away a Rawlings Flexible Sports Organizer to one of my lucky readers!

Organizing sports equipment and outdoor gear can be a challenge. Kids’ balls, bats, gloves, helmets and sticks can create an obstacle course, taking up valuable space in the mudroom, hall closet or garage. Throw clutter a curveball by using the new Rawlings Flexible Sports Organizers.

Available in three varieties with roomy ball caddies and vertical mesh compartments with hooks and cinches to store all kinds of gear, these vertical smart storage solutions can hold up to 25 lbs. of equipment. The Rawlings Flexible Sports Organizers are made of mildew- and abrasion-resistant durable vinyl and mesh, making them as perfect for the garage or shed as for the basement or closets.

GIVEAWAY:

One reader will win a Rawlings Flexible Sports Organizer

HOW TO ENTER:

{Do any or all of the following, leave a separate comment for each you do}

1) Leave a comment telling me what sport(s) your family plays

2) Share this giveaway on a social network

3) Leave a comment on another post

4) Follow @rawlingssports on Twitter

5) Follow @aliciamarie112 on Twitter

Giveaway ends September 6, 2013 at 11:59pm Central time. Must be 18 or older and a US resident to enter.

(Disclosure: I received an organizer to review but all thoughts are my own.)

DACOR Distinctive 30″ Electric or Gas Range Giveaway {$3,100+ Value!}

(Disclosure: I received a book but all thoughts are my own.)

I am so excited to be participating in the Best Lunch Box Ever campaign because I get to take part in offering an amazing giveaway to my readers! Someone is going to win a  DACOR Distinctive 30” Gas Range (ARV $3199) or a DACOR Distinctive 30″ Electric Range (ARV $3399)! The winner can choose between gas or electric and freestanding or slide in models.

Please note: This giveaway is hosted and administered by Best Lunch Box Ever.  They will select and notify the grand prize winner and the prize will be shipped directly from Dacor to that winner. US only. Giveaway ends August 23, 2013. You can find more details on the giveaway here.

Fill out this Rafflecopter form below to enter to win!


a Rafflecopter giveaway

How We Split The Household Responsibilities In Our Home {Swiffer Giveaway}

(Disclosure: This conversation is sponsored by Swiffer but all thoughts are my own.)

I love watching “reality” shows about families. One thing I find really interesting is how they split their household responsibilities. Some families have the children do most of the chores (which is how I grew up), some have only mom or dad responsible for them, and some split the responsibilities.

I believe that every family has to do what works best for them but in our home we split the responsibilities. As a working mom there is no way that I’d be able to handle all of the household chores myself. My least favorite chores are cleaning the bathroom and doing the dishes so Sinisa handles that. Other things Sinisa handles are the trash, the yard work, and most of the cooking. Sinisa hates putting away the laundry so that is something I try to do {though the boys’ clothes get put away more regularly than our clothes do}. I do most of the picking up around the house, general cleaning and organizational tasks.

When it comes to our children we split responsibilities there, too. I watch the boys while he is working and he watches them on his days off. He is the bath giver and meal maker. I pick out their clothes, make sure they have what they need when they need it, and drive them around to their sports and activities.

As our boys grow older I definitely plan on having them do more chores but for now (at ages 4 and 5) their chores consist of helping pick up their toys and living areas.

I love the above video of Lee and Morty, the stars of Swiffer’s new commercials. They are such an adorable couple and I love how Lee uses the products to show Morty how easy it is to clean and he jokes it’s like he’s dancing. Sinisa likes how easy it is to use the Swiffer Wet Jet, too!

Want to win some products that will make cleaning easier for you and your family? Enter to win a Swiffer prize pack below!

GIVEAWAY:

One lucky reader will win a #SwifferEffects kit ($20 value)

HOW TO ENTER:

 {Do any or all of the following. Leave a separate comment for each you do.}

1) Tell me which chore is your least favorite to do

2) Share this giveaway on a social network

3) Follow Swiffer on Twitter

4) Follow me on Twitter

5) Comment on another post

Giveaway ends August 21, 2013 at 11:59pm Central time. Must be a US resident 18 and older to enter.

6 Ways to Keep Your Hardwood Floors Looking New

When you have nice hardwood floors, it’s worth putting in a little work to keep them looking like new. Follow these 6 tips so your hardwood floors will always have the beauty that you enjoy today.

Doormats Are a Deterrent

Knowing how to clean your floor properly will keep it in great shape. It’s even better to keep dirt and water off your floor by using two doormats. Keep one outside and one inside so people can wipe their feet well before stepping on the floor. It also helps to get a walk-off mat for the inside. These mats are usually four to six feet long. The longer it is, the cleaner your shoes will be when they hit your hardwood floor.

Vacuum Your Floor

Even if you make everyone take off their shoes before coming inside, your floors might still get dirty. If the dirt accumulates, it can turn into grit that will scratch the wood’s surface. Vacuum your floor at least once a week to prevent dirt buildup.

Avoid Water and Liquid Cleaners

Never expose your floor to water or liquid cleaners. They can soak into the wood, causing damage that’s difficult to repair. You’ll end up spending a lot of money hiring one of the Tucson flooring companies to fix a problem that you could have easily prevented.

Instead of using liquid cleaners, opt for a no-wax wood cleaner. You can pick it up at any home supply store. Keep it in a handy place, so you can clean up spills and dirt immediately.

Area Rugs Prevent Damage

Image via Flickr by Wonderlane

High-traffic zones are most likely to get damaged by daily wear and tear. Putting down an area rug will protect your hardwood floor. Common high-traffic zones include hallways, doorways, and stairs.

It’s best to use an area rug that doesn’t have a rubber backing. The rubber can trap humidity against the floor, which causes the same problems as cleaning with liquids would.

Clean Your Furniture With Care

If you have wooden furniture, then you want to take special care when you polish it. The polish might make your wood furniture glow, but it can leave a cloudy residue on your floor. Try spraying the polish on a cloth instead of directly on the furniture. That will give you more control.

Know How to Care for Your Floor’s Finish

Your hardwood floor might have a finish made of polyurethane or shellac. If it does, you should never wax the floor. It will create an extremely slippery surface and can damage the original finish.

If you don’t know whether you should use a wax, polyurethane, or other type of polish on your floor, spot test a small area and check for damage. Give the area a couple of days before you polish the rest of the floor. It takes time for damage to present itself.

Do you know other ways to keep hardwood floors looking like new? Or perhaps you’ve tried some restorative methods that did more harm than good. Tell your story in the comments below.

*******

Guest post by Amanda.

Buzz Lightyear {Glow-In-The-Dark} Themed Party

(Disclosure: Compensation and products for review were provided by Glidden via MomTrends. The opinions expressed herein are those of the author and are not indicative of the opinions of Glidden.)

After spending a month or so redecorating the boys room, we were really excited to host a small party and show it off. Since the theme of the room was Buzz Lightyear and we had used the Glidden glow-in-the-dark paint I wanted to have a Buzz Lightyear themed party. It was so fun!

Before it started we had to decorate. Here are some pictures of the decor:

 photo 20130509_142408_zps5d5df365.jpg

***
 photo 20130509_142119_zps57127608.jpg

***

 photo 20130509_142334_zps13113d63.jpg

***

 photo 20130509_142541_zpsfda58bce.jpg

We did a lot of themed activities. Here are some pictures of all the fun we had:

 photo 20130509_143006_zps0de1dba1.jpg

We made Buzz Lightyear themed candy necklaces.

 photo 20130509_143849_zpse68e25d6.jpg

***

 photo 20130509_144205_zpse2d0dfaa.jpg

***

***

 photo 20130509_152442_zpsd638cc40.jpg

We painted white t-shirts with glow-in-the-dark puffy paint. Not my best idea ever apparently since all of the children loaded the paint on and I had to keep all of the shirts to dry.

 photo 20130509_153053_zpseb98ef5e.jpg

***

 photo 20130509_144100_zpse8fa5a3b.jpg

They played an alien game, grabbing aliens with “the claw” like in Toy Story.

 photo 20130509_144500_zpse200a89f.jpg

We also painted figurines. I bought a box of Toy Story ones, a box of Disney Princess ones and a box of Disney Cars ones.

 photo 20130509_145811_zps0e9822c3.jpg

Once it started getting darker we had some glow-in-the dark fun. To start, each child got some glow-in-the-dark bracelets. We also had balloons that glowed in the dark. The kids built a tent with a blanket to sit in so that all the items could shine to their fullest in the pitch black.

 photo 20130509_185957_zps45bc0c0f.jpg
Of course checking out the walls in Jake and Luke’s room was a must. Since their walls are a light color the glow-in-the-dark paint was kind of camouflaged with the lights on (unless you looked closely) so it was a huge surprise when the lights were turned off. With the lights off, the designs on the walls along with the stars on the ceiling glowed.

I was a little disappointed that the big Buzz Lightyear decal I had bought for the wall didn’t glow but it was still cool to have to add to the theme of the room.

Everyone loved the walls. Every night when their light goes off, Jake still says, “Look mom!”. I’m not sure the novelty will ever go away since every night he seems to be amazed that his walls are glowing.

As for my thoughts on the paint, I thought it added some uniqueness to the room. Sinisa thought the paint went on easily and spread evenly. I’d recommend using a sponge tipped brush if using stencils. We originally tried a small roller and that did not work at all and paintbrushes worked okay but I didn’t think they were the best tool we could have used and some of the paint smeared a bit under the stencil and dripped a bit. For stencils we used a cluster of stars, two planets, and a space shuttle.

When it comes to the paint glowing, it should be noted that it only lasts for a short period of time (like 5 minutes). It’s advertised to have a short glowing period so that time frame was expected but I would have liked for it to last a bit longer. The lights also need to be turned on ahead of time for the paint to glow (I’d recommend half an hour or so). Overall, I was pleased with the paint and would use it again in the future.
 photo 20130519_181224_zps772c51ae.jpg

Making Over A Room With Disney Paints {Part 2}

(Disclosure: Compensation and products for review were provided by Glidden via MomTrends. The opinions expressed herein are those of the author and are not indicative of the opinions of Glidden.)

I shared earlier in the month about how we were making over the boys’ room. We got the boys bunkbeds, went shopping for room supplies, and this past week started the transformation. We went with a fun theme of “to infinity and beyond”.

We bought Disney Specialty Paint by Glidden at Walmart. The paint is called “Ready, Set, Glow!”. It is a solar-powered, glow in the dark paint finish that can be used on top of a solid wall color to bring wall art to life in the dark. The glow in the dark paint finish only glows for 5 to 10 minutes or so at a time, so it won’t stretch out bedtime!

Check out some of the items we got for the room:

Stencils and stamps to use with our Glow in the Dark Paint

***

Buzz Lightyear wall decals will decorate the wall during the day.

***

Painted glow in the dark stars, spaceships and planets will make two of the bedroom walls shine at night!

***

Even Jacob got in on the fun of making over the room! He loved adding glow in the dark stars to the ceiling over his bed.

 The walls are painted, the bedroom is decorated and now we are ready to host our Buzz Lightyear party to show off the amazing transformation. Stay tuned for all the fun party details and pictures!

Making Over A Room With Disney Paints {Part 1}

(Disclosure: This is a sponsored post but all thoughts are my own.)

As you all know, we recently moved the boys out of their toddler beds and into bunkbeds. That was a big transition for us all but one that is going pretty well (other than Lucas trying to claim the top bed as his some days). The next step in our room makeover is painting.

I like having neutral color walls but they can be a little boring sometimes so I was excited to hear about a new line of Disney Paints that are available at Walmart now. There are over 112 colors and 5 specialty finishes, including a glow-in-the-dark finish.

We decided on a theme for the room of space. I made a list of items I thought would fit the theme before heading to Walmart. I wanted glow in the dark stars for the ceilings and some Buzz Lightyear decals. I thought these things would go great with the paint. I also wanted to find as many Buzz Lightyear items as I could for a “to infinity and beyond!” party we are going to be hosting for our friends.

I loved how the paint colors were grouped by theme and with coordinating colors. Many of the paint colors also match the Disney bedding that is available at Walmart which makes decorating rooms easy. The display also had some little booklets which gave me ideas of ways I could use the glow-in-the-dark paint.

Once I picked up the paint I headed to get party supplies. I’ve been known to go a little overboard when it comes to party themes and this party, though just a small one, was no exception.

I bought Toy Story themed cupcake supplies, table decor, decorations to hang from the ceiling, and candy bracelets to make. We have white t-shirts to decorate with glow in the dark paints, glow in the dark markers to color with, Toy Story toys, and a Buzz Lightyear fishing game. The party is going to be so fun and I can’t wait to have everyone over to show off the boys’ new room!

Stay tuned for part 2… the painting!

(Disclosure: Compensation and products for review were provided by Glidden via MomTrends. The opinions expressed herein are those of the author and are not indicative of the opinions of Glidden.)

Creating A More Welcoming Dining Room | Home Lighting Makeover

My family and I live in a duplex and have a small dining area that basically consists of a couple cabinets and a rectangular shaped table and chairs set. I had never really thought about decorating the dining area since I have young kids, including a 3 year old who can make a mess out of anything he is eating. Recently I had the chance to makeover my dining room area and GE Lighting sent me some coupons for light bulbs since no room is complete without light. (This is sponsored but all thoughts are my own, as they always are.)

Lucas and I went shopping at our local Walmart and I ooh’d and ahh’d over all of the things I’d love to put in my kitchen and dining area. Colorful mixers, glass cake plates, ceramic bowls… I saw all of the possibilities of what a dream dining space and kitchen could be like and then I came back to reality. I remembered that my space I was working in was small and that I had two little adorable boys who would be touching anything that was within reach. Most of those beautiful things would have to wait but I could do something nice with the space I did have.

I also looked in the lighting area. There were shelves full of light bulbs. Honestly I normally just find cheap light bulbs and am out of the aisle in less than a minute but since I had coupons I actually looked at my options. GE had a great value back of light bulbs for a little over $8 but I chose to get the GE Reveal® light bulbs that came 2 for $12 because of the picture displayed on the front of the box. I liked the idea of having bright, beautiful lighting in my home as opposed to the lighting that is pictured on the left.

Along with the light bulbs I came home with a few things for the dining area including a tiered fruit stand. I have always wanted one and though the bowls are breakable I think it’s sturdy enough to withstand my family. I found a plaque that talked alluded to the fact that I don’t cook that often and some flameless candles (remember those little hands?). I also was thrilled to find some cute decorative jar carriers on clearance that people who can fruits and vegetables probably use that I thought would work to hold bowls of condiments, appetizers, and trifle dishes for dessert. The last thing I decided upon were some colorful tablecloths to add a splash of color to the room.

Once I decorated the boys loved adding fruit to our fruit bowls. Then it was time to change the lighting. Look at what our lighting situation looked like before:

We had a mixture of energy efficient spiral bulbs and regular light bulbs. One of the bulbs had burnt out a few weeks back and we hadn’t gotten around to changing it. The fixture was also dusty so Sinisa cleaned it up a bit and added our new light bulbs. I’d really love to change the fixture but we rent so we are stuck looking at this one every day.

Wondering how much difference the lighting in a room makes? Check out this “before” and “after” picture!

We sat in our newly decorated dining room as a family for the first time yesterday and it was so nice! I had never wanted to sit there before but now I welcome the chance to sit in there. It’s well-lit and it feels inviting with the personal touches I added. One other bonus? We’ve been eating more fruit since it’s prominently placed on the table and I think this whole makeover to our dining area is going to help me lose weight! After we ate dinner I was still hungry but instead of reaching for seconds I helped myself to a small orange. Once I had peeled it and eaten it I was no longer hungry. Who knew that decorating could help you in the weight loss department, too ;)

I normally wouldn’t take time to makeover a room since I always put my wants low on my to-do list so I’m so thankful to GE Lighting and Collective Bias for the push I needed! Now I’m excited to redecorate every room in my home!

(Disclosure: I am a member of the Collective Bias®  Social Fabric® Community.  This content has been compensated as part of a social shopper insights study for Collective Bias® and GE Lighting #cbias #SocialFabric #GELighting)

Furniture From The RoomPlace {Giveaway}

For over a year now I’ve been telling Sinisa that I want to get new couches. The ones we have were bought pre-kids when I thought tan would be the perfect color to match any decor. Ten years later I’m realizing it’s also the perfect color to show every single stain and speck of dirt. I’m literally counting down the days until I can get new seating in our living room so I was more than excited when someone from The RoomPlace contacted me to check out their furniture and offer a giveaway to one lucky reader.

As I searched the site for pieces that would work great in our awkwardly designed living room I was pleased to see their prices were pretty good. I was looking at sectionals since a couch/loveseat combo just doesn’t work in our space and found one on clearance that had eco-friendly leather and four reclining seats. Normally leather would not even be an option because with young kids I don’t want to spend a ton on the furniture but this one was about the same price as others I was looking at in other furniture stores that weren’t leather and didn’t have any reclining seats! This sectional compared to similar ones at other stores is probably around $800-$1000 less. I’m just crossing my fingers and toes that it will still be available when I go to purchase it next month. Here’s a picture:

The RoomPlace, a Chicago-based, family-owned furniture store, just celebrated 100 years of business. The RoomPlace will celebrate the anniversary by offering special discounts, steals and deals that only come around every 100 years. The employees of The RoomPlace will also participate in the company’s “100 Acts of Kindness initiative,” which includes 100 hours of community service, donations to local charities, and more.

They are also doing another special something to celebrate 100 years and that’s giving a $100 gift card to one of you! Yes, that means it’s time to get that new piece of furniture you have been wanting!

HOW TO ENTER:

{Do any or all of the following, leave a separate comment for each you do}

1) Leave a comment telling me what piece of furniture you’d get if you win

2) Share this giveaway on a social network

3) Like The RoomPlace on Facebook

4) Like Making Time For Mommy on Facebook

5) Follow @theroomplace on Twitter

6) Follow @aliciamarie112 on Twitter

7) Comment on another one of my posts

Giveaway ends March 8, 2013 at 11:59pm Central time. US residents 18 and over only.

(Disclosure: I received a gift card for posting about The RoomPlace but all thoughts are my own. This giveaway is not associated with Facebook in any way.)

I am not a homemaker…

I am not a homemaker. I have been fine with this, even joking about it, until recently. After reading other “stay-at-home mom” blogs in the past weeks I’ve begun to feel guilty and I’ve realized that I really could be doing more than I do. Before a couple weeks ago I rarely cleaned and I almost never cooked. One of my goals for 2009 that I shared with my mom’s group was to “cook once a week”. It’s not that we eat out all the time (though we probably do that more often than we should), it’s that I eat a tv dinner or something else easy to make or Sinisa cooks when he comes home from work. I really am going to try to make an effort to cook more this year. This is my next step in becoming more “domesticated” (is that even a word?)

Right now though, my focus is on keeping my house “company ready”. Before I could never just invite people over when I felt like it because I always had to “prepare” my home for visitors. For the first time this past weekend I was on the phone with someone and said “why don’t you come on over?”. Let me tell you how great it felt to be able to say that. Granted it was only family (my sister in law) but before I had never felt comfortable enough to say that and the thought of someone coming over unannounced gave me anxiety. Even though my house has stayed clean, I am not following my “daily” and “weekly” lists that I made for myself so that is one area I would like to improve on.

I’m off to get some things accomplished now. My to-do list for tonight includes:

-Putting laundry away that’s in the dryer

-Update “goals”

-Going through my email inbox and deleting some old emails (my inbox has over 3500 emails in it!) My goal is to delete 500 tonight…

-Write up a monthly budget (or at least start it)

-Post some pictures of Jacob on facebook

Of course I also am going to watch tv, including the Bachelor. Should be interesting tonight because it’s the “women tell all” episode…